> ## Documentation Index
> Fetch the complete documentation index at: https://docs.apten.ai/llms.txt
> Use this file to discover all available pages before exploring further.
# Building an Automation
> Create an automation on the visual builder, publish it, and turn it on.
## Overview
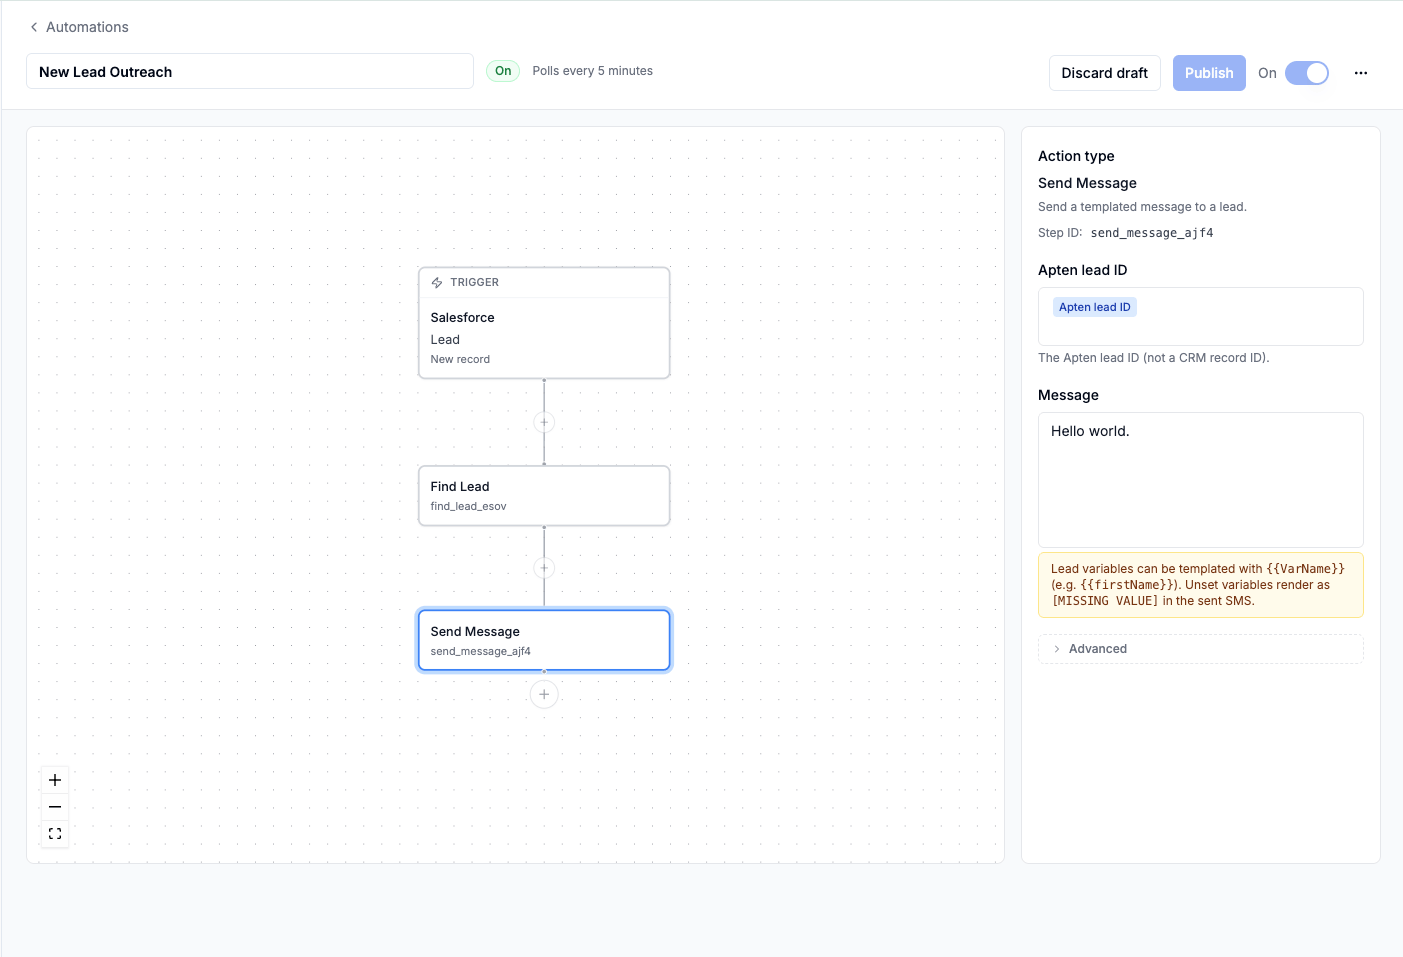
Automations are built on a visual canvas: a **Trigger** card at the top, connected to a vertical chain of step cards. You add steps with the **+** buttons on the canvas and configure whichever card is selected in the panel on the right. Edits autosave to a draft; nothing goes live until you click **Publish**.
 ## Step 1: Create the Automation
1. Go to **Automations** in the sidebar
2. Click **Create Automation**
3. Give it a name — the title field at the top of the page. A name is required to publish.
New automations start as a **Draft**: they exist only for you and never run until published and turned on.
## Step 2: Configure the Trigger
Select the **Trigger** card and choose your **Trigger source** (CRM), **Object**, and **Trigger type** in the right-hand panel. See [Triggers](/automations/triggers) for the full breakdown of trigger types and conditions.
## Step 3: Add Steps
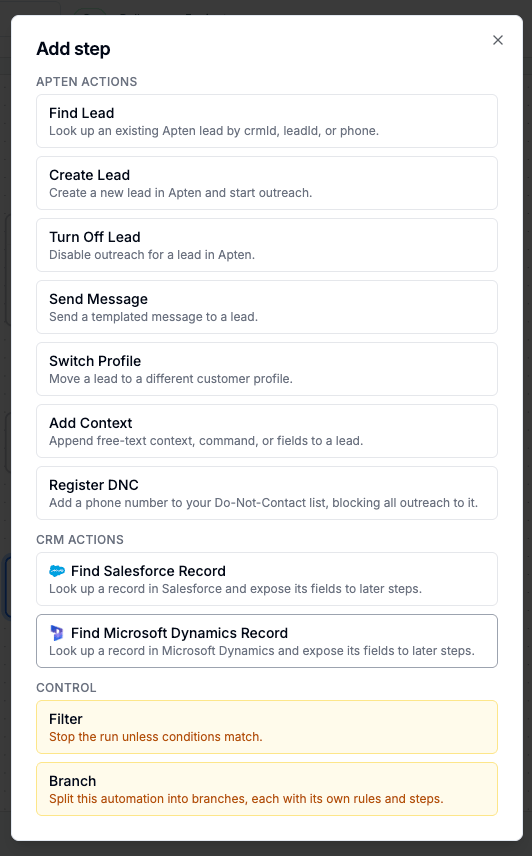
Click the **+** button below the last card (or on a connector between cards, to insert a step in the middle). The **Add step** dialog offers three groups:
* **Apten Actions** — act on leads in Apten: Find Lead, Create Lead, Turn Off Lead, Send Message, Switch Profile, Add Context, Register DNC, Resolve Timezone. See [Actions](/automations/actions).
* **CRM Actions** — look up a record in a connected CRM (for example **Find Salesforce Record**) and expose its fields to later steps.
* **Control** — **Filter** (stop the run unless conditions match), **Delay** (pause before continuing), and **Branch** (split into multiple paths). See [Control Steps](/automations/control-steps).
## Step 1: Create the Automation
1. Go to **Automations** in the sidebar
2. Click **Create Automation**
3. Give it a name — the title field at the top of the page. A name is required to publish.
New automations start as a **Draft**: they exist only for you and never run until published and turned on.
## Step 2: Configure the Trigger
Select the **Trigger** card and choose your **Trigger source** (CRM), **Object**, and **Trigger type** in the right-hand panel. See [Triggers](/automations/triggers) for the full breakdown of trigger types and conditions.
## Step 3: Add Steps
Click the **+** button below the last card (or on a connector between cards, to insert a step in the middle). The **Add step** dialog offers three groups:
* **Apten Actions** — act on leads in Apten: Find Lead, Create Lead, Turn Off Lead, Send Message, Switch Profile, Add Context, Register DNC, Resolve Timezone. See [Actions](/automations/actions).
* **CRM Actions** — look up a record in a connected CRM (for example **Find Salesforce Record**) and expose its fields to later steps.
* **Control** — **Filter** (stop the run unless conditions match), **Delay** (pause before continuing), and **Branch** (split into multiple paths). See [Control Steps](/automations/control-steps).
 Steps run in order, top to bottom, and each step starts only after the previous one succeeds. To remove a step, hover over its card and click the trash icon.
An automation can have up to **10 top-level steps**, up to **10 steps inside each branch**, and up to **75 steps in total**. Branches can be nested up to **3 levels deep**. Control steps count like any other: a Branch step takes one of the 10 slots in the chain that contains it, and Filter, Delay, and Branch steps count toward the 75-step total.
## Step 4: Reference Data From the Trigger and Earlier Steps
Most step fields accept dynamic references. Type **/** in a field to open a picker of available values:
* **Trigger fields** — data from the CRM record that fired the automation, inserted as `{{trigger.FieldName}}`
* **Step outputs** — results from earlier steps, inserted as `{{steps..output.FieldName}}`
For example, a **Find Lead** step outputs the lead's Apten ID; a **Send Message** step placed after it can use that output as its **Apten lead ID**. This *find, then act* pattern is the backbone of most automations — see [Actions](/automations/actions).
Every step has a **Step ID** shown in its configuration panel — click it to copy, then paste it into a reference by hand if you prefer.
## Step 5: Publish
Click **Publish**. Apten validates the whole automation first — if anything is missing or invalid, a banner lists each issue and the offending cards are outlined in red. Fix the issues and publish again.
While editing a published automation:
* Your changes autosave to a draft; the live version keeps running unchanged, and an **Unpublished changes** pill appears next to the status badge.
* **Publish** replaces the live version with your draft.
* **Discard draft** throws away your edits and keeps the live version as-is.
Runs that are already in progress use the version of the automation they started with, so publishing changes doesn't alter them. Turning off or deleting an automation does not stop other in-flight runs, but if the automation is off or deleted when a Delay ends, that waiting run halts instead of continuing.
## Step 6: Turn It On
Published automations have an **On/Off** toggle at the top of the page. Turn the toggle **On** to start watching your CRM.
Some triggers show an **Activating…** status for a short time while Apten prepares — see [Triggers](/automations/triggers#turning-an-automation-on) for what happens during activation.
## Deleting and Restoring
Deleting an automation stops it immediately and moves it to the **Recently deleted** tab, where it can be restored for **30 days**. Restoring recreates the automation as a draft for you to review and publish — it never comes back turned on automatically.
Run history for a deleted automation is preserved for **90 days** on the [Runs](/automations/runs) page.
Steps run in order, top to bottom, and each step starts only after the previous one succeeds. To remove a step, hover over its card and click the trash icon.
An automation can have up to **10 top-level steps**, up to **10 steps inside each branch**, and up to **75 steps in total**. Branches can be nested up to **3 levels deep**. Control steps count like any other: a Branch step takes one of the 10 slots in the chain that contains it, and Filter, Delay, and Branch steps count toward the 75-step total.
## Step 4: Reference Data From the Trigger and Earlier Steps
Most step fields accept dynamic references. Type **/** in a field to open a picker of available values:
* **Trigger fields** — data from the CRM record that fired the automation, inserted as `{{trigger.FieldName}}`
* **Step outputs** — results from earlier steps, inserted as `{{steps..output.FieldName}}`
For example, a **Find Lead** step outputs the lead's Apten ID; a **Send Message** step placed after it can use that output as its **Apten lead ID**. This *find, then act* pattern is the backbone of most automations — see [Actions](/automations/actions).
Every step has a **Step ID** shown in its configuration panel — click it to copy, then paste it into a reference by hand if you prefer.
## Step 5: Publish
Click **Publish**. Apten validates the whole automation first — if anything is missing or invalid, a banner lists each issue and the offending cards are outlined in red. Fix the issues and publish again.
While editing a published automation:
* Your changes autosave to a draft; the live version keeps running unchanged, and an **Unpublished changes** pill appears next to the status badge.
* **Publish** replaces the live version with your draft.
* **Discard draft** throws away your edits and keeps the live version as-is.
Runs that are already in progress use the version of the automation they started with, so publishing changes doesn't alter them. Turning off or deleting an automation does not stop other in-flight runs, but if the automation is off or deleted when a Delay ends, that waiting run halts instead of continuing.
## Step 6: Turn It On
Published automations have an **On/Off** toggle at the top of the page. Turn the toggle **On** to start watching your CRM.
Some triggers show an **Activating…** status for a short time while Apten prepares — see [Triggers](/automations/triggers#turning-an-automation-on) for what happens during activation.
## Deleting and Restoring
Deleting an automation stops it immediately and moves it to the **Recently deleted** tab, where it can be restored for **30 days**. Restoring recreates the automation as a draft for you to review and publish — it never comes back turned on automatically.
Run history for a deleted automation is preserved for **90 days** on the [Runs](/automations/runs) page.